Manage organisation
person Compliance Officers are able to edit details and settings of the organisation.
person Advanced Users are only able to view details and settings of the organisation.
Manage Organisation
In the Administration > Organisation section the Compliance Officers can:
- View list of organisations and heirarchy you are assigned to
- Edit organisation and sub organisation profiles, which comprise of:
- Organisation Details
- Scan Settings
- Users
- List Access
- Add new sub-organisations
- Disable and enable organisations.
In the Administration > Organisation section the Advanced User can:
- View list of organisations and heirarchy you are assigned to
- View organisation and sub organisation profiles, which comprise of:
- Organisation Details
- Scan Settings
- Users
- List Access
Organisation Profile
Default view of organisation list where the no organisation is selected. 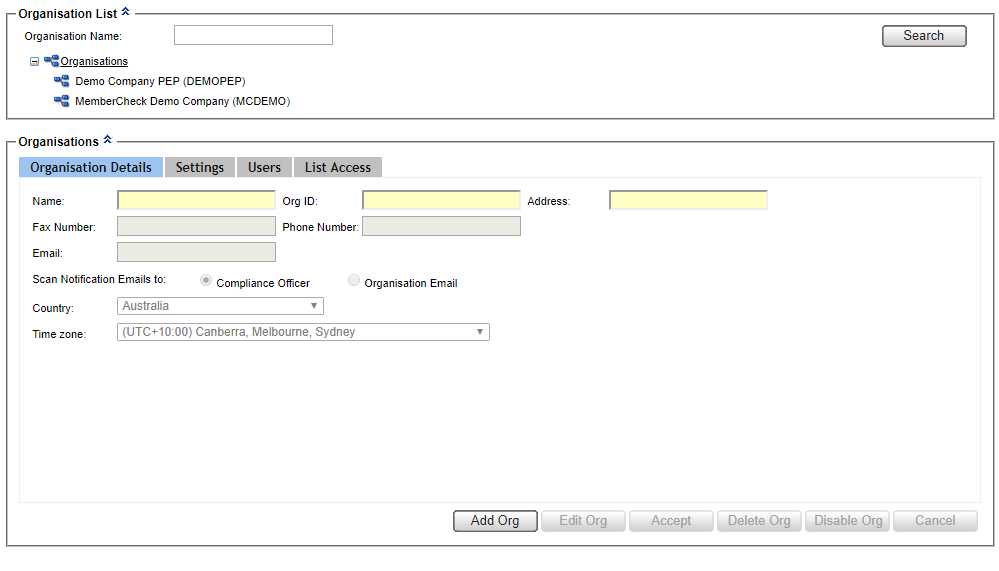
Select an organisation in the Organisation List to view detailed profile. 
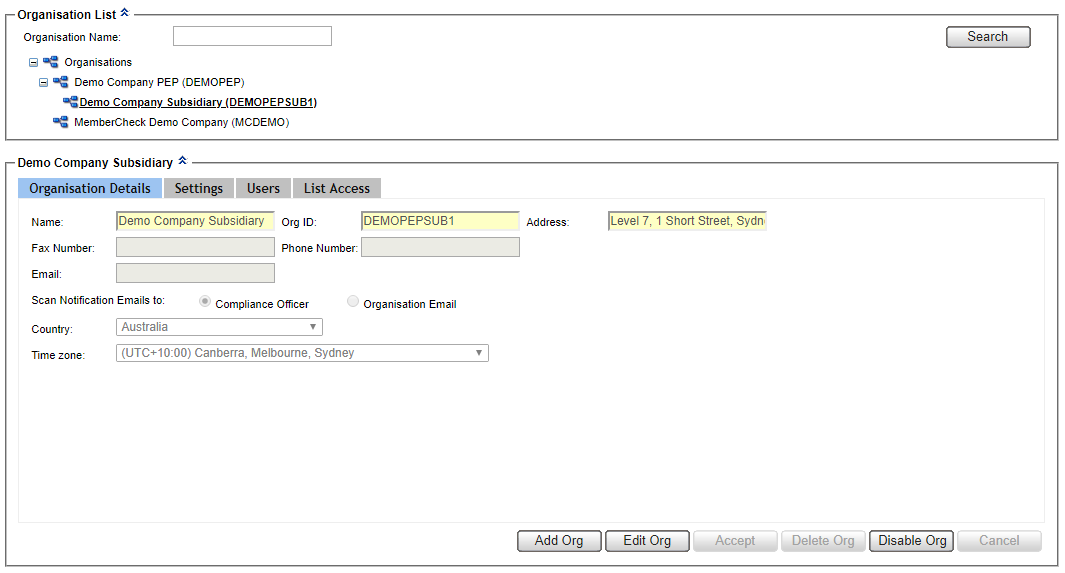
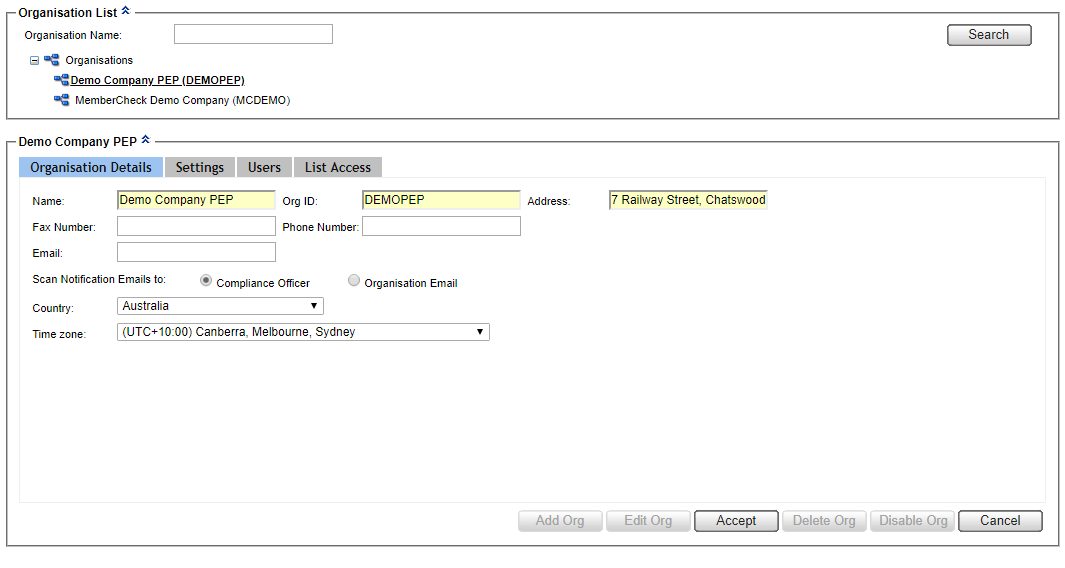
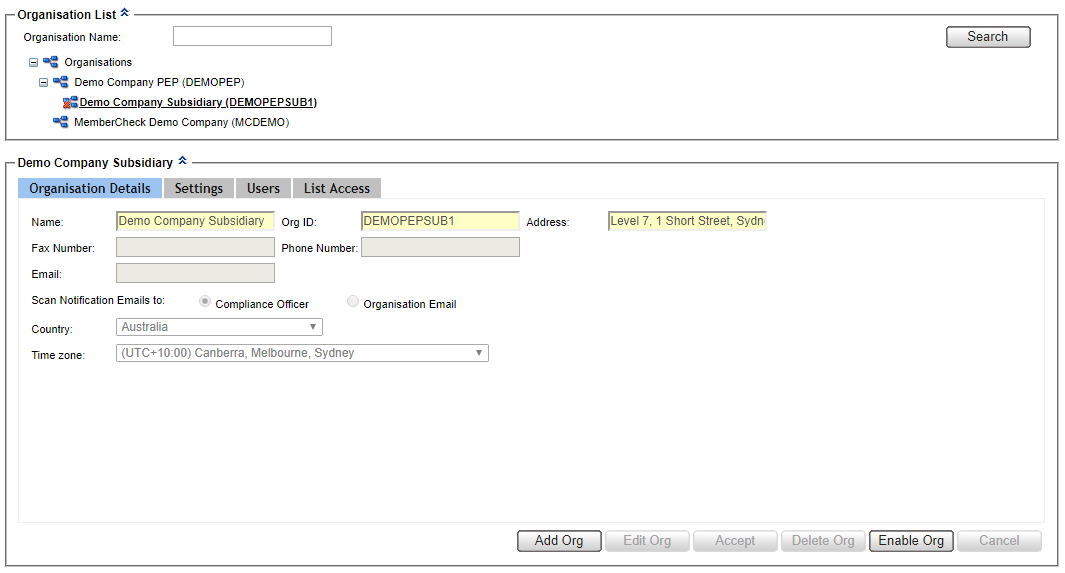
Organisation Details
The Organisation Details tab allows you to view or edit the following details, for the organisation selected from the Organisation List:
| Field | Required | Description |
|---|---|---|
| Name | Mandatory | Legal name of the organisation. announcement If you change the name of the top level Organisation, please notify support@membercheck.com so that we can update our records. |
| Org ID | Mandatory | Unique identifier for organisation. Maximum acceptable length is 20 alphanumeric characters |
| Address | Mandatory | Address of the organisation or head office. Free format |
| Fax Number | Optional | Free format. |
| Phone Number | Optional | Free format. |
| Conditional | Organisation email or email address to receive scan notifications. This is Mandatory if you opt to have Scan Notification Emails to set to | |
| Scan Notification Emails to | Mandatory | Options: Compliance Officer (default), Organisation EmailScan notifications are sent to the Compliance Officer's email address by default. If you prefer to have scan notifications sent to an alternative email address, select the This setting applies to Scan Notification Emails only. All other communication from MemberCheck Support will be sent to the Compliance Officer's email address. |
| Country | Mandatory | Country where the organisation is based. This affects the Time zone used for the organisation. |
| Time zone | Mandatory | Time zone is automatically set based on the selected Country, however it can be changed to cater for different regions with different time zone settings. This time zone will be used for all dates and times displayed for the organisation, with the exception of the Activity Report, which is based on Australian Eastern Standard/Daylight Saving Time. Time zone is displayed against the Last Login date and time on the MemberCheck banner, for reference For users that are assigned to an organisation belonging to a group of organisations with different time zones, the time zone displayed against the Last Login date and time will be that of the group's parent organisation. |
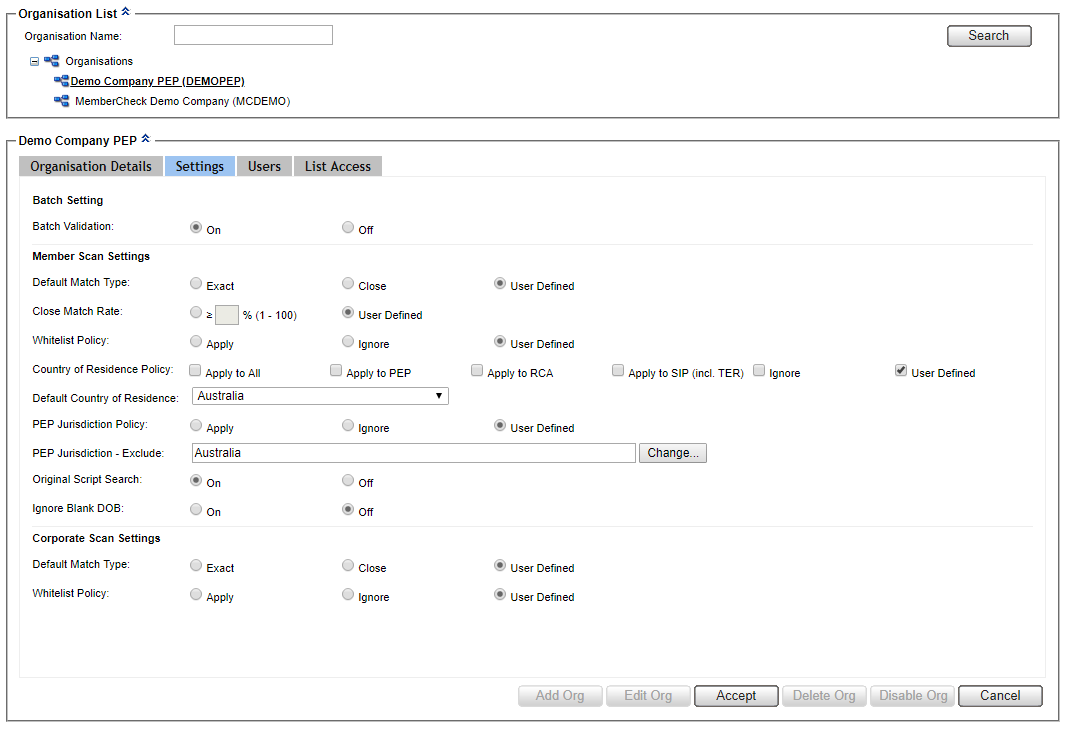
Settings
The Settings tab allows you to view or edit the scan settings for batch scans, member scans and corporate scan for the organisation selected from the Organisation List.
If your organisation is subscribed to the PEP & Sanctions only service, you will see the following settings: 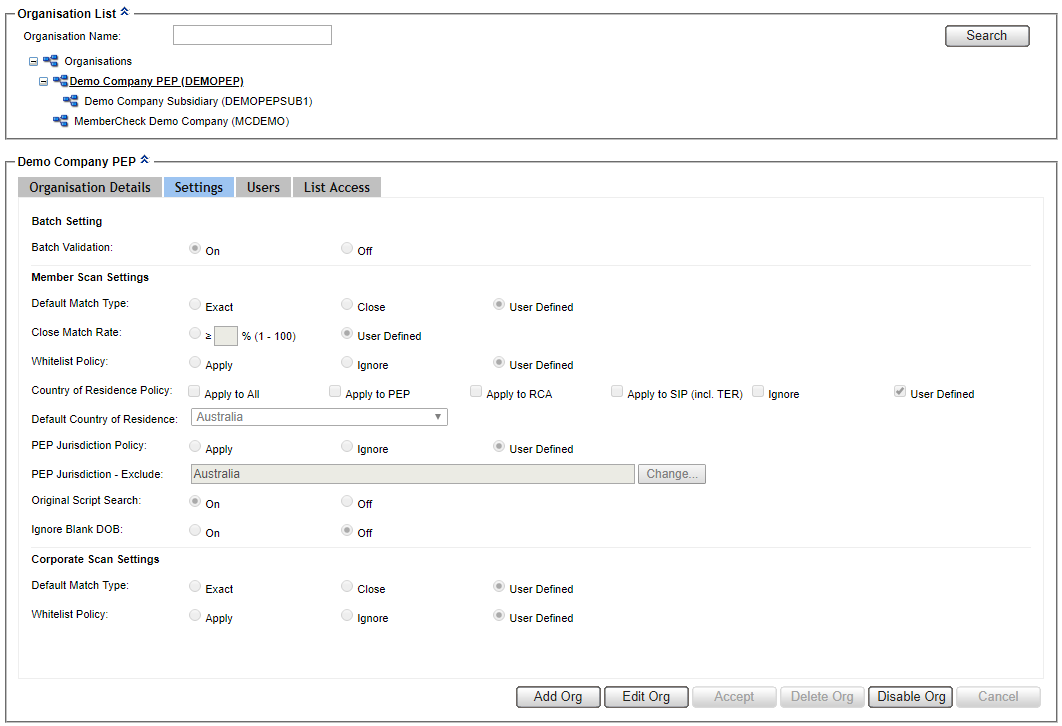
Batch Setting
| Field | Required | Description |
|---|---|---|
| Batch Validation | Mandatory | A setting that determines if batch file validation is performed prior to scanning. Options are:
|
Member Scan Settings
| Field | Required | Description |
|---|---|---|
| Default Match Type | Mandatory | A setting that defines the default match type across the organisation for all scans of members. Options are:
|
| Close Match Rate | Mandatory | An additional setting for Close matches only. Allows scan results to be refined by setting a Close Match Rate threshold. Options are:
|
| Whitelist Policy | Mandatory | A setting that ensures previous due diligence decisions, i.e, a member is determined to not be a watchlist entity, are taken into account in future scans. Therefore, previous match results will not be returned as a match. Options are:
|
| Country of Residence Policy | Mandatory | A setting, for member scans, which allows matches to be ignored if the member's Country of Residence is different to that of the matching watchlist entity. This rule can be applied to selected category matches or to all matches,. Options are:
|
| Default Country of Residence | Mandatory | Used for nominating a Country of Residence for member addresses where a country cannot be identified. To utilise the Country of Residence Policy, a country needs to be identified in the member's Address field. For member addresses, which are not blank but do not contain an identifiable country, if a Default Country of Residence has been nominated, it will be automatically assigned to the member as the Country of Residence, in both single and batch scans. For MemberCheck users outside Australia, selecting a Default Country of Residence removes the need to add the country to the address of a member where a country does not already exist in the member's records. For Australian MemberCheck users, selecting The default setting is announcementDefault Country of Residence should be set once and not changed as no record is kept of changes to this setting. personOnly a Compliance Officer can select a Default Country of Residence, it cannot be user defined prior to scanning. |
| PEP Jurisdiction Policy | Mandatory | A setting which allows matching PEPs and their RCAs to be excluded if their Jurisdiction is identified as being one of the countries specified in PEP Jurisdiction - Exclude. The default which is set by the scanning organisation's Compliance Officer, is Options are:
Ignore. |
| PEP Jurisdiction - Exclude | Mandatory | Allows you to specify PEP Jurisdictions to exclude from the scan results. Excluded Jurisdictions are displayed in the adjacent input box. PEP Jurisdiction includes an Your obligations under the appropriate AML/CTF or AMC/CFT legislation should determine which PEP Jurisdictions you choose to exclude. |
| Original Script Search | Mandatory | A setting, which when turned On, provides an additional Original Script Name field in the scan parameters to allow single and batch scanning of a person's name in its original script (e.g. Arabic, Chinese, Cyrillic, Indonesian, Korean, Japanese, Thai and other non Latin/Roman scripts).Options are:
|
| Ignore DOB Policy | Mandatory | A setting, which when turned On, allows matches where the watchlist entity does not have a DOB to be eliminated.Options are:
When this option is
|
Corporate Scan Settings
| Field | Required | Description |
|---|---|---|
| Default Match Type | Mandatory | A setting that defines the default match type across the organisation for all scans of corporate entities. Options are:
|
| Whitelist Policy | Mandatory | A setting that ensures previous due diligence decisions, i.e, a member is determined to not be a watchlist entity, are taken into account in future scans. Therefore, previous match results will not be returned as a match. Options are:
|
Users
The Users tab allows you to view or change the associated users with the selected organisation in the Organisation List.
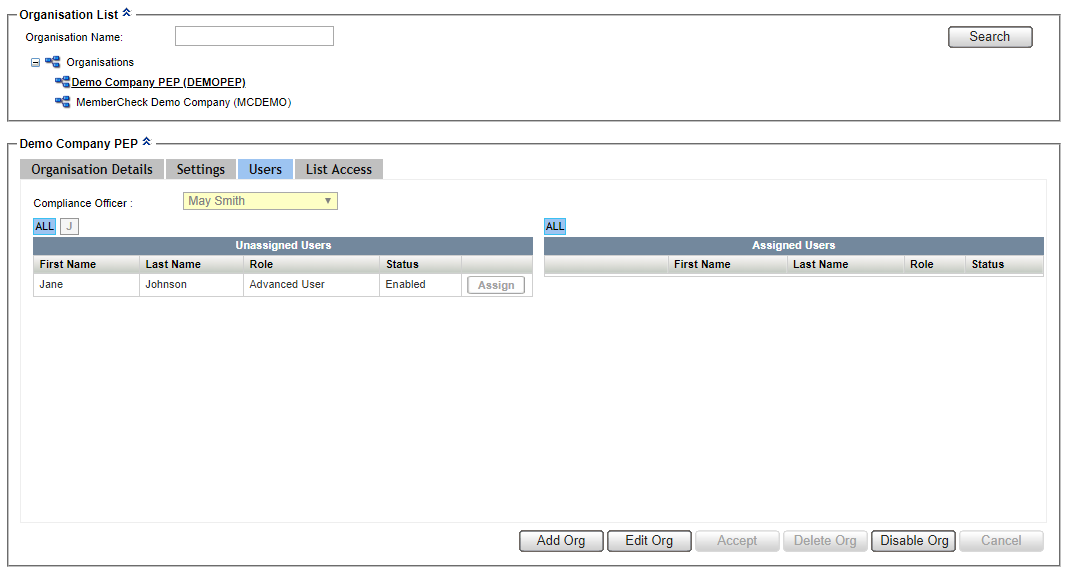
| Field | Description |
|---|---|
| Compliance Officer | Full name of the assigned Compliance Officer for the selected Organisation. Compliance Officers in sub organisations are available for selection in the list. |
| Unassigned Users | List of users associated with the primary organisation which are not assigned to the selected organisation. |
| Assigned Users | List of users assigned to the selected organisation. |
List Access
The List Access tab allows you to view or select the available watchlists in the system and the selected watchlists for the selected organisation from the Organisation List.

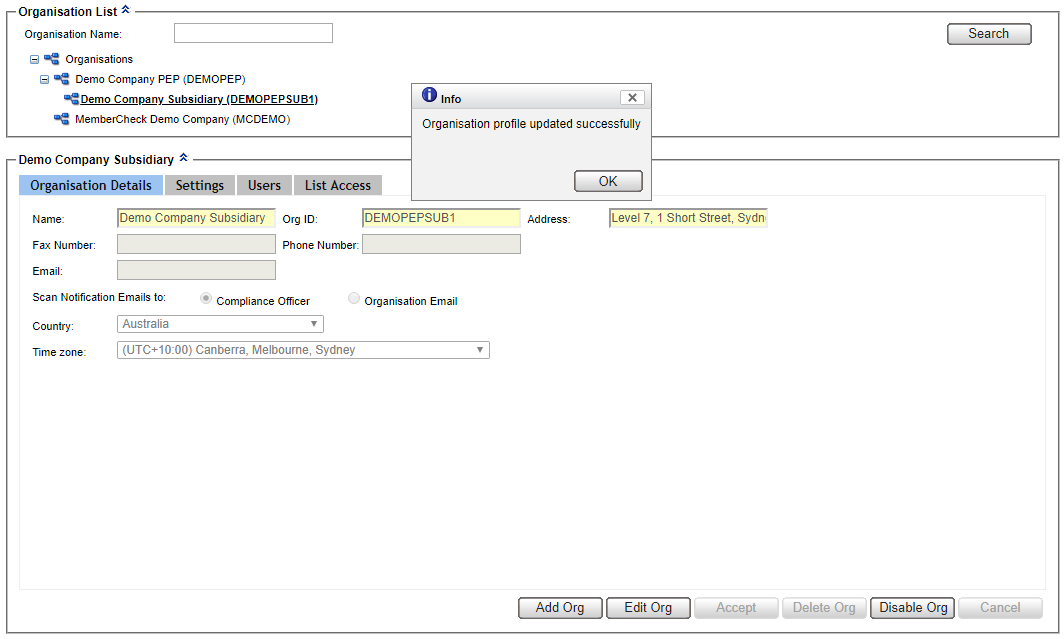
Edit Organisation
person The following are applicable for Compliance Officers only.
Organisation Details
Select Administration > Organisation from the Main Menu.
Organisations are displayed in the Organisation List. You can search by entering an Organisation Name and clicking the
Searchbutton.Select the Organisation from the Organisation List and click the
Edit Orgbutton.The organisation profile view is changed to edit mode.
Check and update the relevant information of the organisation profile and contact details such as Address, Phone Number, Email.
Changing your organisation name
If you change the name of the top level Organisation, please notify support@membercheck.com so that we can update our records.
Scan notification emails can be sent to either the
Compliance Officeror theOrganisation Emailin the Email field.Alternative email address to receive scan notification emails
If the Compliance Officer does not want to receive all scan notification emails, specify an alternative recipient in Organisation Email.
Whilst in edit mode, you can click on the other tabs to view and edit Settings, Users, and List Access details.
If no further changes are required, click
Acceptto save changes and return to the protected view mode.
Settings
Click the Settings tab.
You can choose the scan settings, including Batch Validation, set defaults for Whitelist Policy, Country of Residence Policy, Default Country of Residence, PEP Jurisdiction Policy, and Member and Corporate Match Types.
You can also enable additional features such as Original Script Search and Ignore Blank Date of Birth.
Enable Batch Validation to check for incorrect formatting or invalid data in the batch files for Member and Corporate scans before running a scan.
Ignored records are not included in scan result statistics or displayed in scan reports.
If all records in the batch file are invalid, the batch file will be rejected and the batch scan will show an error.
Errorwill be displayed as the status against the scan in the Batch Scan History.Check and select the default scan settings for users, Default Match Type, Whitelist Policy, Country of Residence, PEP Jurisdiction Policy.
User Definedallows users to select their own setting before scanning or you can predefine scan settings.Select Default Country of Residence if appropriate.
Enable Original Script Search to enable scanning by Original Script Name.
Enable Ignore Blank DOB to enforce matching by Date of Birth.
Whilst in edit mode, you can click on the other tabs to view and edit Settings, Users, and List Access details.
If no further changes are required, click
Acceptto save changes and return to the protected view mode.
Users
Assigning new users to organisation
MemberCheck users must be created in the User section first before they can be assigned to an organisation.
For details, refer to Add New User
Click the Users tab.
A list of all users associated with the selected organisation with their role and status is displayed in both the Unassigned Users and Assigned Users tables.
The assigned Compliance Officer is displayed in the Compliance Officer drop down list. You can change the assigned Compliance Officer if there are multiple users with the Role
Compliance Officerwithin your organisation hierarchy.To assign a user to the selected organisation, click
Assignadjacent to the user.To disassociate or unassign a user from the selected organisation, click
Unassignadjacent to the user.Whilst in edit mode, you can click on the other tabs to view and edit Settings, Users, and List Access details.
If no further changes are required, click
Acceptto save changes and return to the protected view mode.
List Access
Click the List Access tab.
A list of all available watchlists for both Members and Corporates are displayed.
Details of these watchlists can be found at Watchlist Category Selection
Select or de-select the adjacent checkboxes to include or exclude in Member and Corporate scanning.
Whilst in edit mode, you can click on the other tabs to view and edit Settings, Users, and List Access details.
If no further changes are required, click
Acceptto save changes and return to the protected view mode.
Add an Organisation
person The following are applicable for Compliance Officers only.
Compliance Officers can create a new entity or organisation as a sub-organisation within the organisational group. If an error is made in the creation of the new organisation, the details of the organisation can be changed at any time.
To Add an Organisation
Select the organisation or the parent organisation in the Organisation List.
You will not be able to create a new organisation under the root Organisation.
Click the
Add Orgbutton.A blank organisation profile is displayed with the Organisation Details tab selected.
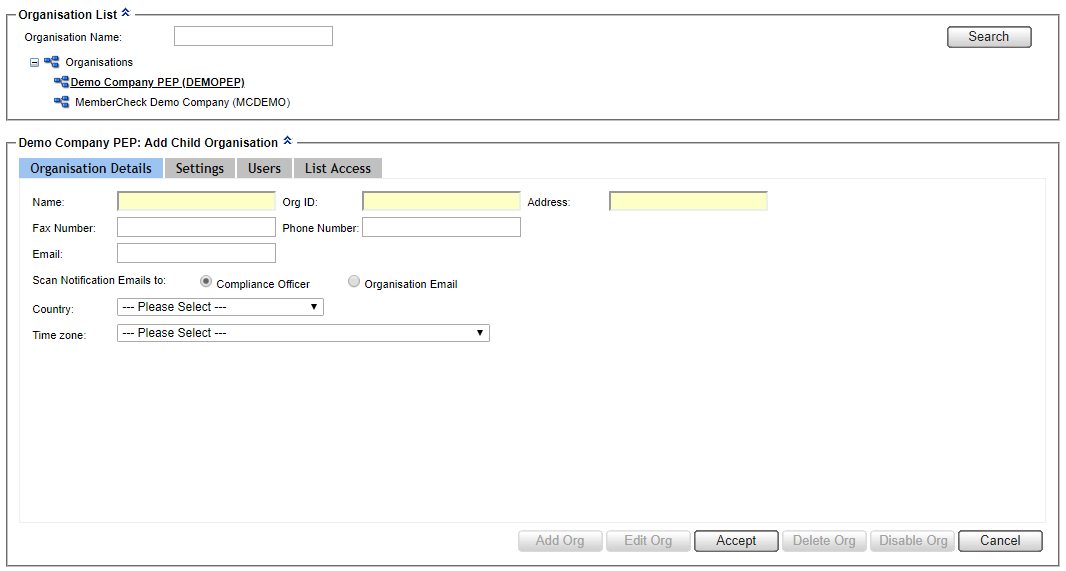
Enter the Organisation profile and contact details, ensuring you fill in the mandatory fields such as Name, Org ID, Address, Email (if Scan Notification Emails are to be sent to Organisation Email) and Country.
For details, refer to Organisation Details.
Select Settings tab to check scan settings and defaults. Alternatively, you can click
Acceptto save changes before checking the settings in the other tabs.For details, refer to Settings.
Select Users tab to assign users to the new organisation.
For details, refer to Users.
If you attempt to create the new organisation with no users or Compliance Officer assigned, a dialog prompt will be displayed to warn you.
Select List Access tab to check selection of watchlists for the new organisation.
For details, refer to List Access.
Click
Acceptto create the new organisation.
The new organisation will be displayed in the Organisation List.
Disable or Enable an Organisation
person The following are applicable for Compliance Officers only.
If you wish to prevent an organisation from being able to perform scans, you can disable it.
When an organisation is disabled it is removed from the list of available organisations for all assigned users, thereby preventing them from being able to perform scans, view scan history, and view activity reports.
person Compliance Officers have access to disabled organisations and the ability to edit the organisation profile, including enabling the organisation.
To Disable an Organisation
Select the Organisation in the Organisation List.
Click the
Disable Orgbutton.Click
OKin the dialog box to confirm that you want to disable the selected organisation.The organisation icon in the Organisation List will be annotated with a red cross.
To Enable a Disabled Organisation
Select the Organisation in the Organisation List.
Click the
Enable Orgbutton.Click
OKin the dialog box to confirm that you want to enable the selected organisation.The red cross annotation of the organisation icon in the Organisation List will be removed and users assigned to this organisation will be able to perform scans.