Member Scan History
Scan History (PEP & Sanctions)
person Compliance Officers can see all scans by all users, for the organisations for which they are assigned. To see scans for other organisations in the organisation hierarchy, for which they are not the Compliance Officer, they will need to create themselves a login with the User Role of Advanced User.
person person person Advanced Users, Billing Officers and Auditors can see all scans by all users, for the organisations to which they are assigned.
person Standard Users can see only scans that they have performed, for the organisations to which they are assigned.
person Data Entry Operators cannot see any scans performed for the organisation to which they are assigned.
Member Scan - Scan History allows you to search for records of all scans performed for the selected organisation.
By default, no scanned records are displayed until you initiate the search. The options for single scan results with matches found are checked. To change or expand the displayed scan results, you can filter the list of member match results by the scan parameters (Date range, Scan Type, Match Type, Whitelist Policy and Scan Result) and by member match result criteria (Individual Member details, watchlist Categories, Due Diligence Decisions and Assessed Risk).
You may see a screen similar to the image below. If your organisation and user account has been enabled for ongoing monitoring, you will see the additional Scan Type option Automatic Scans.
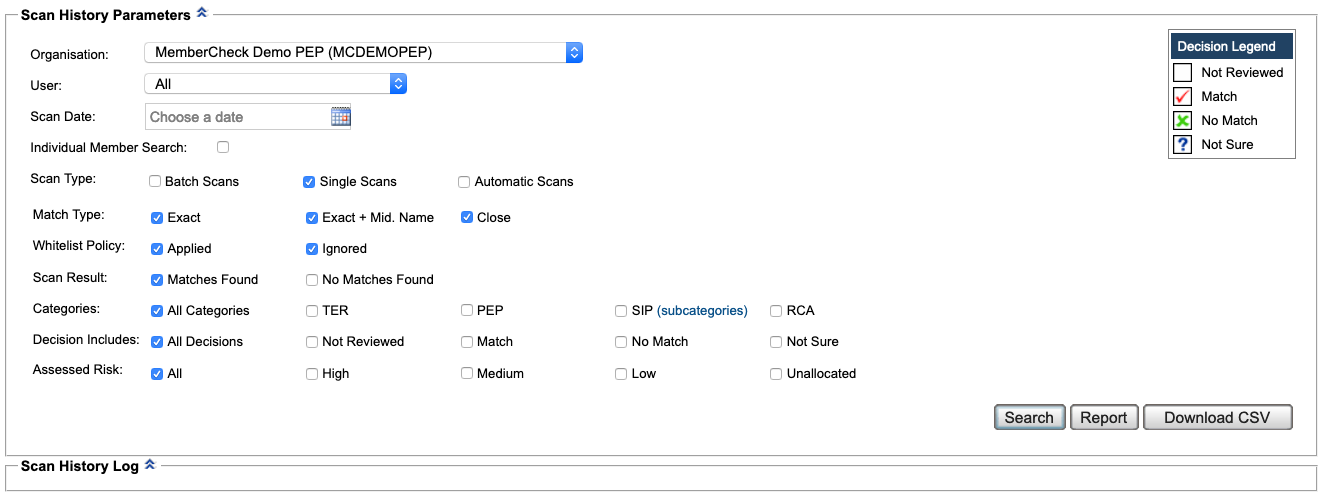
If you are assigned to multiple organisations, select the Organisation for which you want to view the Scan History.
Viewing activities of disabled organisations
person Only Compliance Officers are able to view history and activities of disabled organisations.
You can select the checkboxes for inclusion in the search filter and can either expand or narrow the number of matches displayed in the Scan History Log using the following fields:
| Name | Description |
|---|---|
| User | Select from a list of users assigned to the selected organisation to filter user scan activities. Defaults to |
| Scan Date | Specific scan date or date range. Click the calendar icon |
| Individual Member Search | Select the checkbox to expand the following fields:
*) in the relevant fields.For example, enter |
| Scan Type | Options:
|
| Match Type | Options: Exact, Exact + Mid. Name, Close |
| White List Policy | Options: Applied, Ignored |
| Scan Result | Options: Matches Found, No Matches FoundBy default, only scan results with matches in the watchlists are displayed. To display all scans including no matches found, select the |
| Categories | Options: All Categories; or one, or any combination, of TER, PEP, SIP, RCA
Note: If  To filter by a SIP subcategory, select the Categories and subcategories separately.  |
| Decision Includes | Options: All Decisions; or one, or any combination, of Not Reviewed, Match, No Match and Not Sure decisions |
| Assessed Risk | Options: All or one, or any combination, of High, Medium, Low or Unallocated.Note: Assessed Risk can only be allocated to matches with |
 on the right hand side of the date field to display dates and calendars from which you can select the appropriate date or date range. This automatically enters the selected date/s into the field ensuring the correct date format.
SIP subcategories applicable to scans starting Sept 15, 2020
The filtering of subcategories are available for scans made from September 15, 2020.
Click the Search button to display the results below in the Scan History Log, or the Report button to display the results in a format that can be exported for archiving or printing.
Scan History Log

If monitoring has been enabled for your account, you may see the additional options for ongoing monitoring:

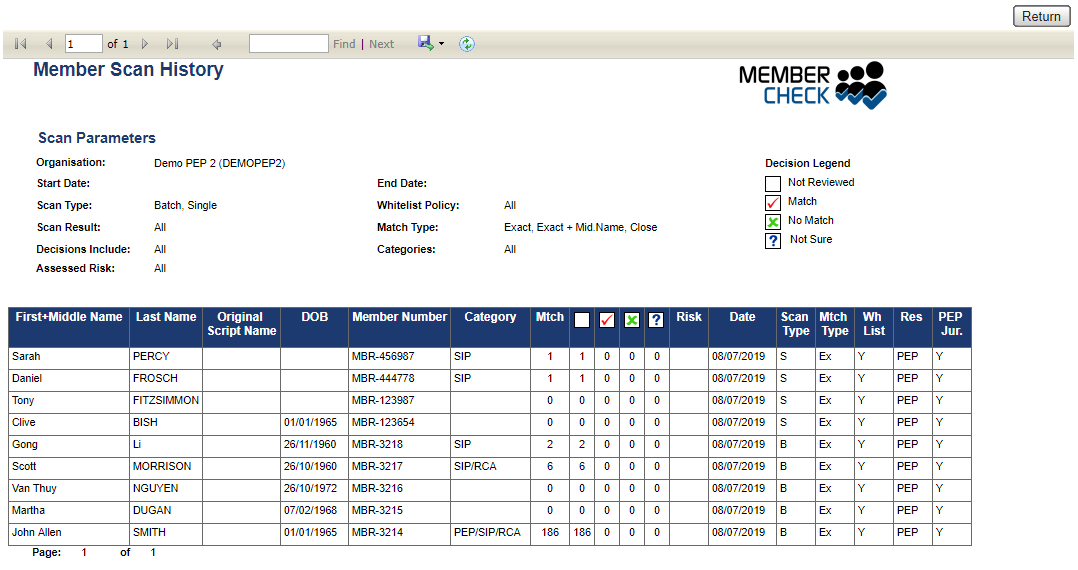
The Scan History Log lists the scan match results for the scans that you searched for on the Scan History page.
Where lists of results are displayed, 20 result lines are displayed per page. The total number of results and the current position in the list being displayed is shown on the top right of the list (for example: Results: 1-20 of 111). You can browse through the list using the First, Previous, Next and Last buttons, or go directly to a specific page by entering a number in the Go To Page field.
The following is displayed for each match result:
| Name | Description |
|---|---|
| Match result | Indicator for: Match Found Match Found No Match Found No Match Found |
| Monitor | Toggle to enable or disable monitoring on the member. Members who are monitored will also appear in the Monitoring List in the main menu. |
| Member Details | Details that were scanned against the watchlists:
|
| Member Number | Unique identification associated with the member. |
| Category | Displays the categories that the matched records in the watchlists belong to, which can be any or any combination of the following:
|
| Mtch | Number of matches for each member scanned. |
| Decisions | Displays the number of each type of due diligence decision taken: Match Match No Match No Match Not Sure Not SureNote: No Match is always 0 when the Whitelist Policy is |
| Risk | Displays assessed risk of High (H), Medium (M) or Low (L) if risk has been allocated to a matching entity that has a Match or Not Sure decision recorded against it. |
| Date | Date the scan took place |
| Scan Type | Type of scan: Single (S) or Batch (B) |
| Mtch Type | Match Type: Close (Cl) or Exact (Ex) or Exact+Mid. Name (EMN) |
| Wh Policy | Whitelist Policy: Applied (Y) or Ignored (N) |
| Res | Residence Policy: Applied to one or any combination of PEP, SIP (incl. TER) or RCA (Y) or Ignored (N) |
| PEP Jur | PEP Jurisdiction: Excluded... (Y), Ignored (N) |
Select a match in the log to view the Scan Result details for the scan matches (Found Entities), or click the Report button to display the log in a format that can be exported for archiving or printing.
Warning
When selecting the Report button, if the Scan History Log contains a large number of records, an Info dialog is displayed to inform you how many records the report may generate and asks if you want to continue.
Scan History Log Report
The Scan History Log Report displays the Scan History Log in a format that can be exported for archiving or printing.
The Scan History Log Report displays the following:
The Report header bar provides the following functionality:
| Element | Description |
|---|---|
 | First, Previous, Next and Last buttons to navigate through a multi-page report. |
 | Find (search for text within the report) and Next (find the next instance of the search term.) |
 | Export drop down list for selecting a format in which to export the report - Excel, PDF or Word. |
 | Refresh button - to update the report in real time. |
Exporting large records to Excel
If you choose to export the report to Excel, Microsoft Excel may have limitations on the number of records supported. If you are exporting a large number of records e.g. over 1 million records, you should export to a PDF file.
Scroll bars allow you to view the entire report.
The bottom left of the report displays the number of the current page and the total number of pages, e.g. Page 10 of 20.
Click the Back button to return to Scan History Log.
Scan Result Details
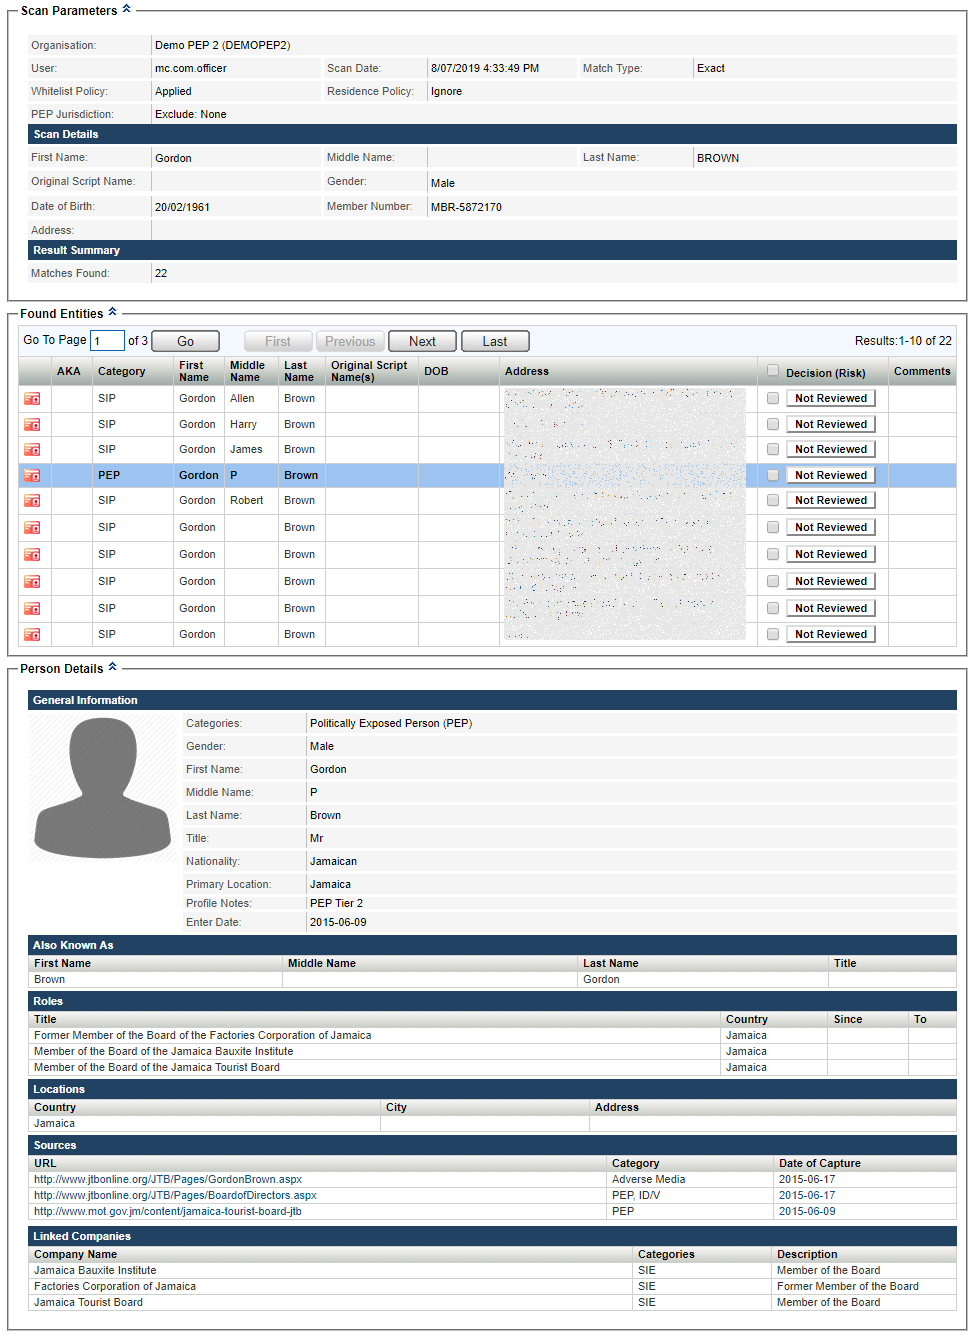
The Scan Result page displays details of the Scan Parameters used and member information that was scanned and lists Found Entities that were identified from the watchlists as possible matches.
Selecting a Found Entity displays that Entity's Profile Information (all available information from the watchlists) in the Person Details section.
This information can help you to determine whether the match is real and the likelihood of the member being a risk under your organisation’s AML/CTF obligations. Each Entity has a Decision (Risk) button (providing that a member number was included in the Scan Parameters) to enable you to record due diligence decisions, add comments and allocate an assessed risk for Match and Not Sure decisions.
Add Member Number to enable due diligence
Include a Member Number to enable recording of due diligence decisions, comments and allocate assessed risk.
Example of scan result and person details
Note
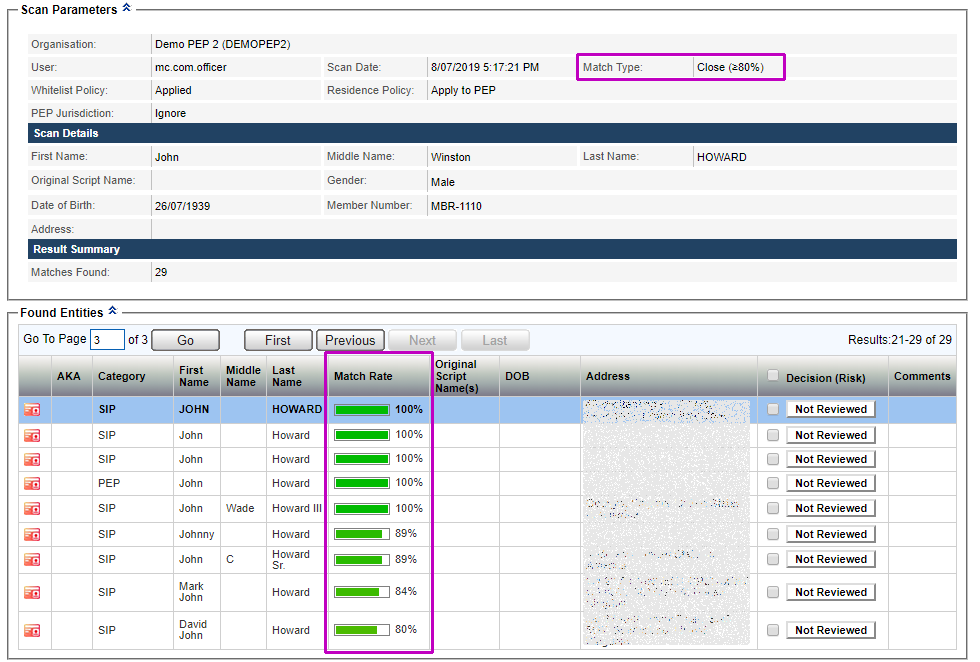
Close Match scan result details display the Close Match Rate threshold applied to the scan results. It defaults to greater than or equal to 80% if no value is entered.
The Match Rate, expressed as a percentage and displayed as a coloured bar for easy analysis, is displayed for each Found Entity.
By default, the details for the first Found Entity in the list are displayed beneath the list of Found Entities.
To view Person Details for a different Entity, click the relevant Entity in the list.
The Scan Result Details highlights the entry and displays the following:
| Section | Description |
|---|---|
| Scan Parameters | Displays the Organisation and User performing the scan, Scan Date, Match Type, Whitelist Policy, Residence Policy and PEP Jurisdiction Policy. Scan Details displays the member details that were scanned against the watchlists. Results Summary displays the total number of matching Entities found. Filtering the results by SIP subcategory will not change this number. |
| Found Entities | A list of found entities, which shows the following information, where available, for each Entity. If you have selected specific SIP subcategories for your Scan History search, you will only be presented with the profiles which match the SIP subcategory.
|
| Person Details | Displays details of the selected Entity. See the following table for details. |
Person Details of the entity:
| Fields | Description |
|---|---|
| General Information |
|
| Also Known As | For each AKA name:
|
| Roles | This is only available for PEP profiles:
|
| Important Dates | For each Date:
|
| Locations | For each Location:
|
| Official Lists | For each List:
|
| Sources | For each Source:
|
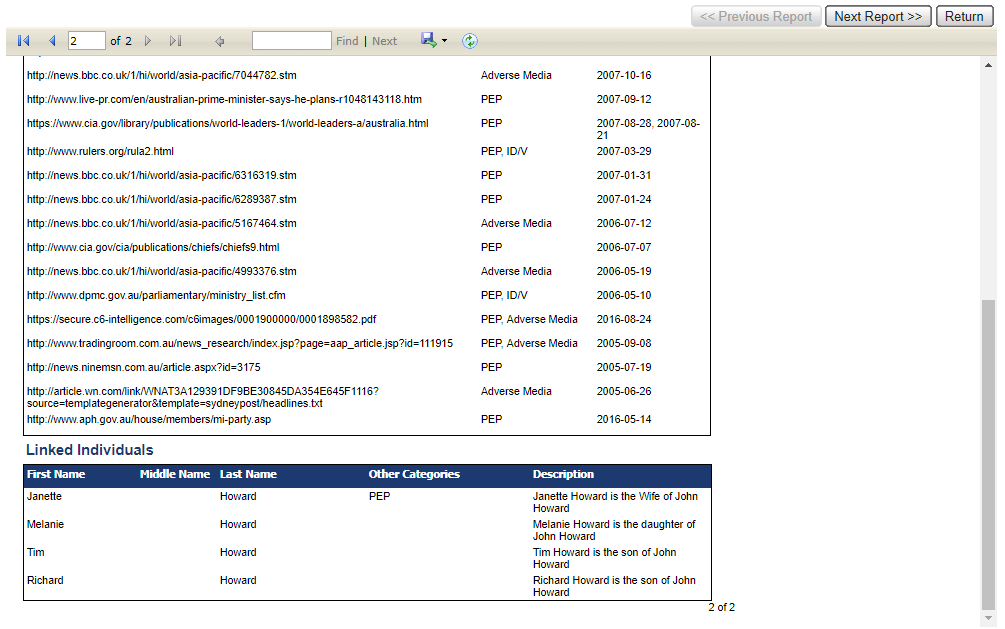
| Relatives/Close Associates | Represents family members and close personal and business associates of PEPs defined as known sexual or non-sexual partners outside the family unit; business partners or associates, especially those that share (beneficial) ownership of legal entities with the PEP, or who are otherwise connected (e.g., through joint membership of a company board). In the case of personal relationships, the social, economic and cultural context may also play a role in determining how close those relationships generally are. Linked Individuals For each relative/associate:
Linked Companies For each company:
|
The Back button returns to the Scan History Log.
The Report button displays the Scan Result Details in a format that can be exported for archiving or printing.
Internet Explorer users
If you are using Internet Explorer, your browsing history settings may cause different details to be displayed on the Report. To prevent this from happening it is recommended that you set your Browsing History to check for newer versions of stored pages "Every time I visit the webpage." If you are unsure of how to do this, please contact your IT Administrator.
Scan Result Details Report
The Scan Result Details Report displays the Scan Result Details in a format that can be exported for archiving or printing.
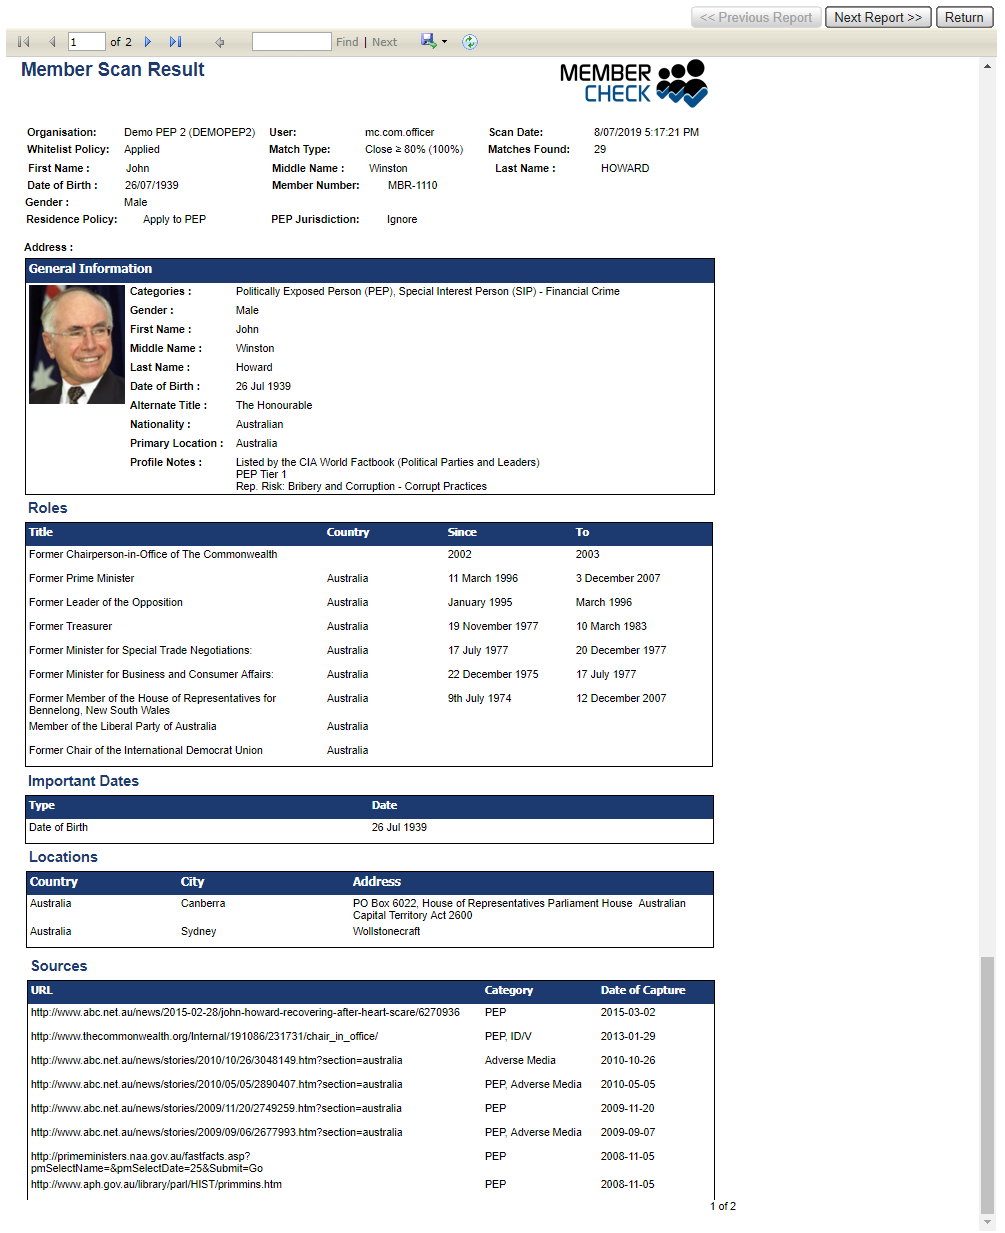
The Scan Result Details Report displays the following:
If there are multiple matches returned for your scan, you can browse the matched results using Previous Report and Next Report.
The Back button returns to the Scan Result Details for the selected Found Entity.
The Report header bar provides the following functionality:
| Element | Description |
|---|---|
| First, Previous, Next and Last buttons to navigate through a multi-page report. |
| Find (search for text within the report) and Next (find the next instance of the search term.) |
| Export drop down list for selecting a format in which to export the report - Excel, PDF or Word. |
| Refresh button - to update the report in real time. |
Scroll bars to allow you to view the entire report.
At the bottom right of the report, the number of the current page and the total number of pages, e.g. Page 10 of 20.